- Member ID
- #1181
- Messages
- 1,580
- Reactions
- 5,227
- Likes
- 162
- City
- COLUMBUS
- State
- KS
- Country
- United States
- Vehicle
- MANGO D170
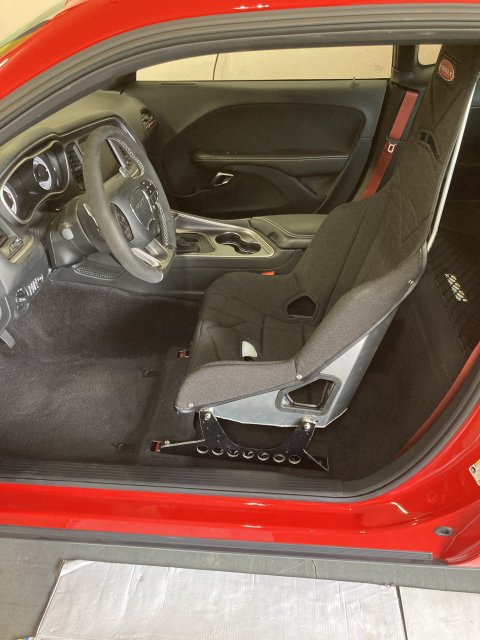
I was hesitant to do this until I finally sat in one in a couple Freinds cars. Most of us use the17" wide seat. All of us have a little extra but not much overweight. Shortest is 5'7" and.......One friend is 6'6" tall and he can sit in my Seat with 1/2" clearance to the headliner (Helmet on). But he DOES want the seat back farther. In his own car I am pretty sure he uses the same seat, but 18.5" wide.
I wanted my setup to be as light as possible and to be as versatile as possible. So I extended my steering column back/out all the way. I have to extend my foot to get WOT but can get hard on the brake pedal. Arm length is fine. With this setup I am thinking 6' drivers should fit ok. Much shorter than me and you will need 2" foam behind your back and we do have it handy.
I am going to ramble a lot and be sure and read all before each image.
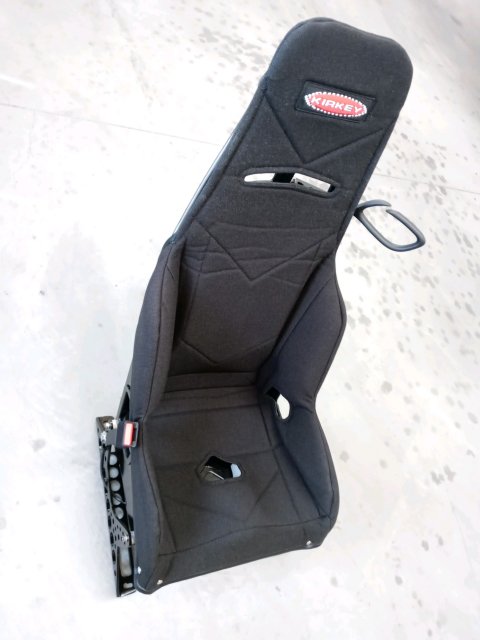
Seat is a Kirkey 55170 Pro Street Drag. It has an 18 deg lay back and based on my Brackets the layback is even more. But I dislike the seat to be reclined a lot so I bet most will be OK with this setup.
I chose a Black Tweed KirKey seat cover. It has intergal foam that fits awesome. So,100% reccomended. 5517011.
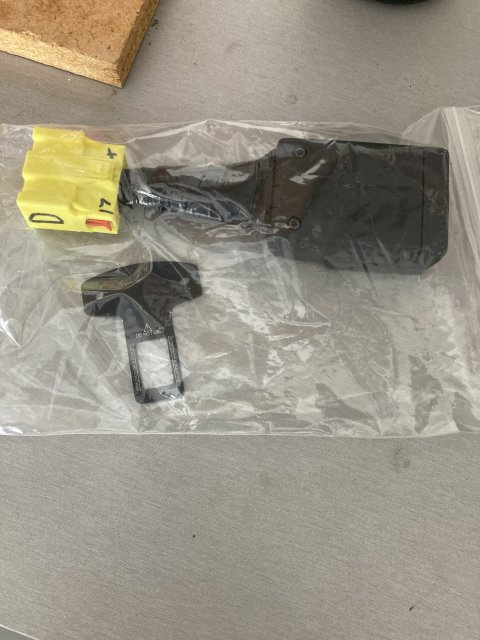
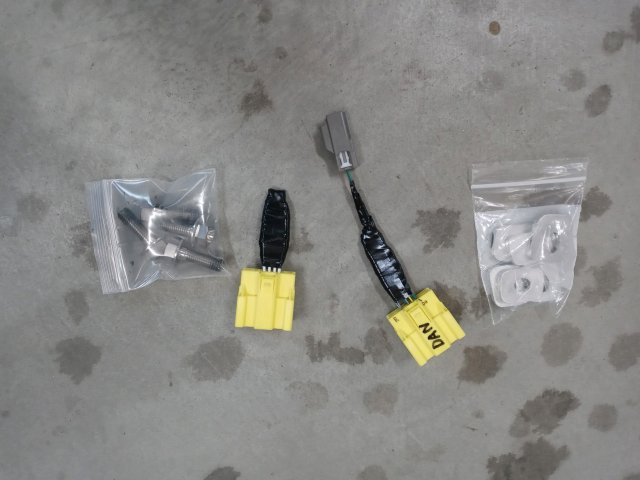
Use a Mopar 1VL12DX9AE Seat Belt Buckle. Dremmel off the clocking pin or drive it out. Do NOT cut the wires off, since it makes it less useful.
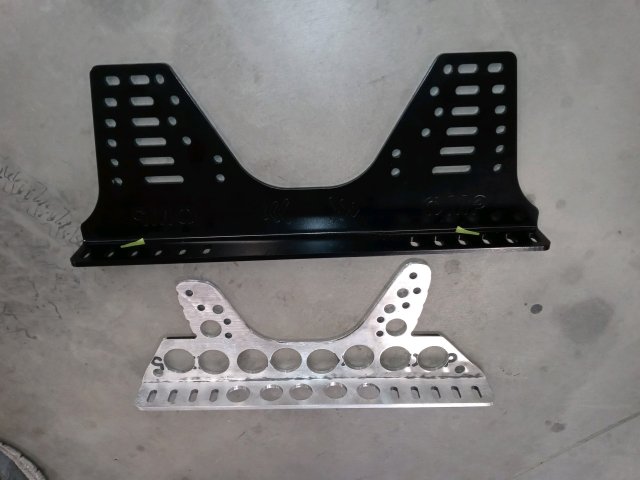
Brackets are OMP HC925 36 hole, tall, aluminum. This is the ONLY Bracket that I found was tall enough and long enough to span the floor bolt pattern.
Floor mounting bolts are 10X1.5X30mm and I got TI here : https://www.ebay.com/itm/133507068513?var=432966129557
Seat mounting bolts are 5/16X1.25 UHL. I used TI fine thread.
Seat Belt Guide Mopar 1UV47DX9AA .
The first go round I used the Planted Steel Base for 2008+ Challenger Driver Side and their Aluminum Side Brackets. But that stuff is HEAVY. If you just want something to bolt in this would be the way to go. But you are still going to have to drill four 5/16" mounting holes in the side of the seat. I bet that setup unmodified would be 10-12 pounds heavier. It can use the same seat belt buckle. If you do not want to fabricate anything then most of the following will not be of much help, except the mounting bolt holes you could follow the same procedure, I think.
I also am going to talk about a wider seat. The next size up is an 18.5". One good thing about using the spacers with the 17" seat is it moves the bracket out from being flush with the side of the seat. If you did not use spacers it would be a good idea to dress down that weld bead some with a flat file because it sticks out a little. So this setup could easily be used with the 18.5" seat. You would use NO spacers between the brackets and the side of the seat, and the enlargments in the base slots where the floor mounting bolts go would move over .25". Then the bracket to seat mounting bolts would be 5/16X.75" UHL (under head length).
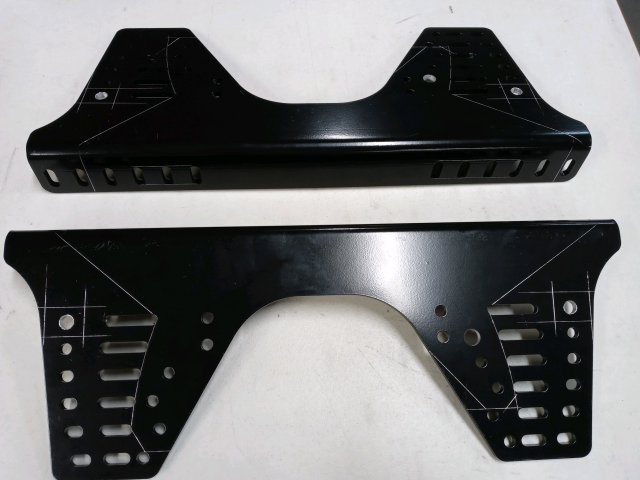
I made my Brackets and then ended up making 2 more sets. I layed out the cut lines a little different for the last 2 sets and I like they way they look way better.
This is the first set. If you pay attention you can see what holes are used and copy these. Except I would lay the cut lines out slightly different as you will see. This is MY SEAT SET for the 5'9" driver (give or take). I am 5'9" tall and 185 pounds. This bracket weighs 1.2 pounds, or less as pictured.

Here are the second sets. You can see I layed out the cut line more direct and it turned out much better. Also NOTE, one of these sets is for a taller Driver and is moved back ONE SLOT. This is as far as you can go back with these brackets since that was the last slot available. But be advised you COULD get the seat back about 3/4 to 1" farther by drilling the mounting holes farther forward on the seat.

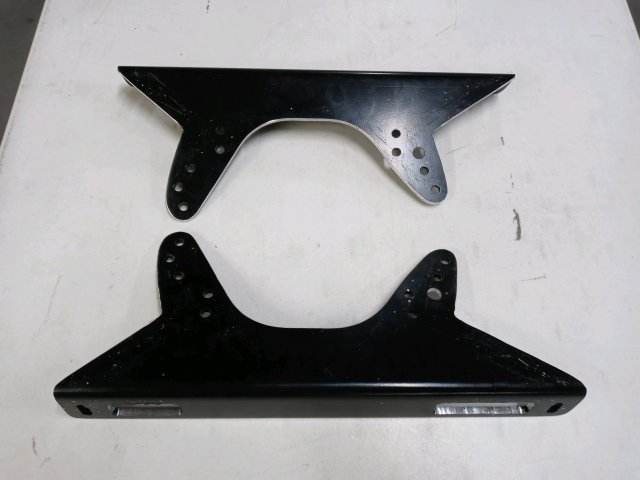
OK, the floor mounting bolts fall right in line with the side of the seat. So in order to use these brackets you will need to use 1" of spacers total to move the brackets out. I used the remnants to make the spacers. So, two 1/4" spacers between the bracket and the seat on each mounting bolt. They must be large OD so you have lots of shear for strength. Here is a finished pic so you can see the result.
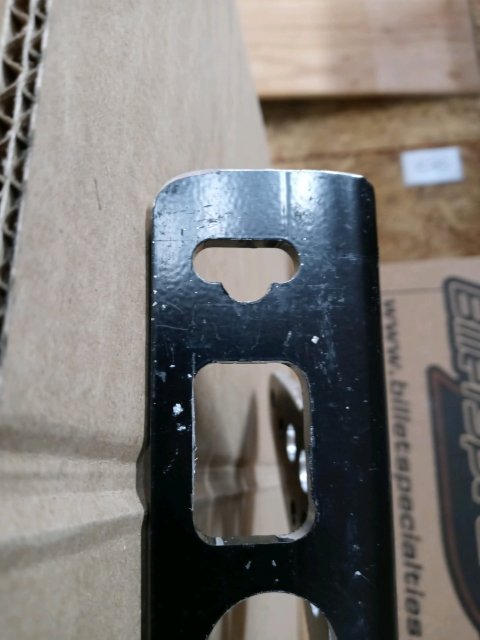
ALSO NOTE, the slots in the bracket do not line up exact with the floor bolt pattern and they are not wide enough, since they are for a 3/8" bolt VS the 10mm we are using. You have to enlarge the slot anyways, so kill 2 birds with one stone. I split the difference and file both end holes 1/8" twoards each other. This is clearly shown in this Pic, lower right.
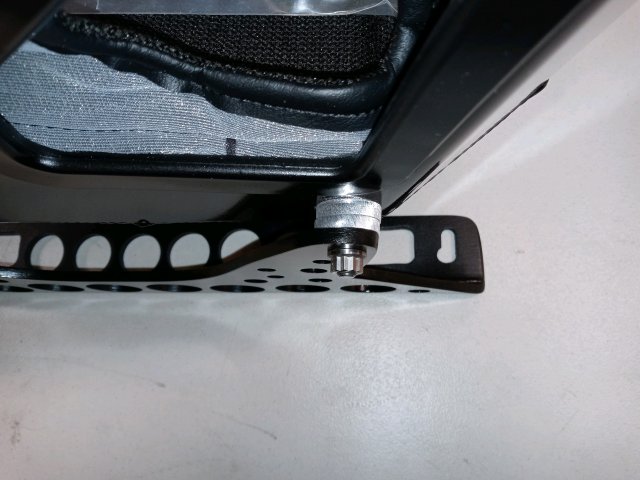
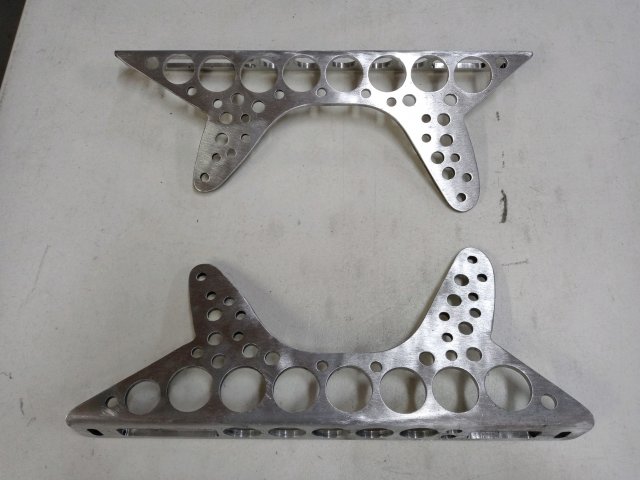
The next thing is, I did not want the bracket sitting on the carpet and crushing the carpet and possibly the result is the bolts come loose. So, I used some of the other Remnants to make 1/4" thick Aluminum floor spacers. You could carefully cut the carpet and that way the bracket would sit metal on Metal and the bracket/seat would sit 1/4" lower.
Floor spacers seen in the pic on the right.
If you go the full route I will give you some tips. It is easier to lay out all your cut lines and cut the bracket down BEFORE trying to hole saw and drill any lightening holes. It's fits on the drill press table better. It is also WAY EASIER to lay out your cut lines for the FLOOR SPACERS and cut them first or at the same time as the basic shape of the bracket. I even drilled the holes to 10mm before cutting since that is easier too. I used a scribe and just scratched the black paint for my cut lines. I also buffed all the paint off with an silicon carbide deburring stringy disc in a hand drill. This de burrs all the holes. As seen in the one pic. Then I hit them on a belt sander etc to dial them in.
Now you need to drill the holes in the seat. 5/16" holes. Measure from the farthest back flat surface 3/4" and then measure up 3/4". It's important to do a nice job here, so take your time. I used a punch to locate the canter and drilled a 1/8" pilot hole, then 5/16. Now go to the correct location in the front and draw a line 3/4" up on the side. Next put a temporary short 5/16 Bolt and nut in the back hole you just drilled. Use the bracket as a template and center on the line you just drew. I also center punched and did a pilot hole first just to be sure. A transfer punch would be ideal here. I did this complete setup for a Friend and it turned out great. The seat with brackets installed does not rock on the bench. My personal one did. Not sure if my mounting holes were skewed or if my seat is slightly warped.
Also NOTE: if you want the seat back farther then you can drill these holes farther forward. Pay attention because there is not much practiacl useable room left to go forward.
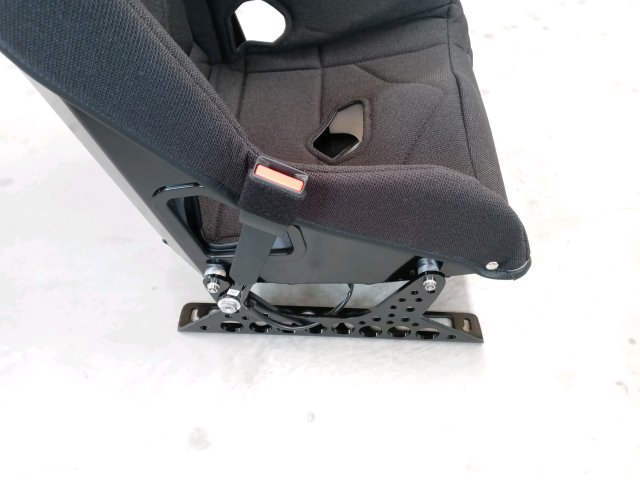
You can see the seat belt buckle bolts directly to the side bracket with a 1/2" bolt. I used a 1/2" drill bit to do some of the lightening holes and so I had a couple different ones to use. The cover kind of straddles the aluminum so the buckle needs to be a little higher than you might think with the cover off.
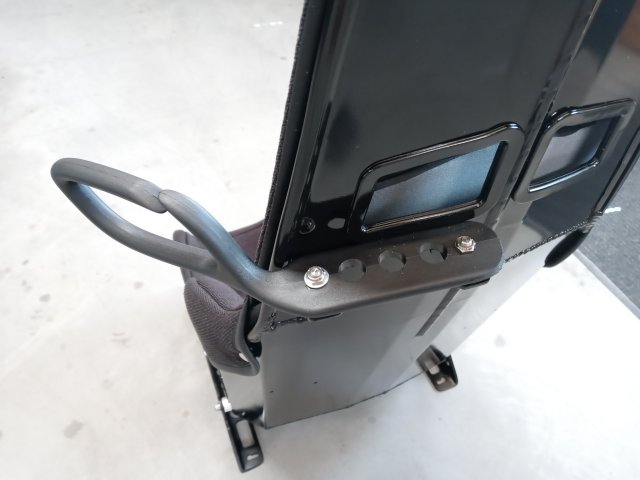
I made a couple small brackets and bolted on a seat belt guide. It has to be shortened but this sould be a reasonable location for most drivers.
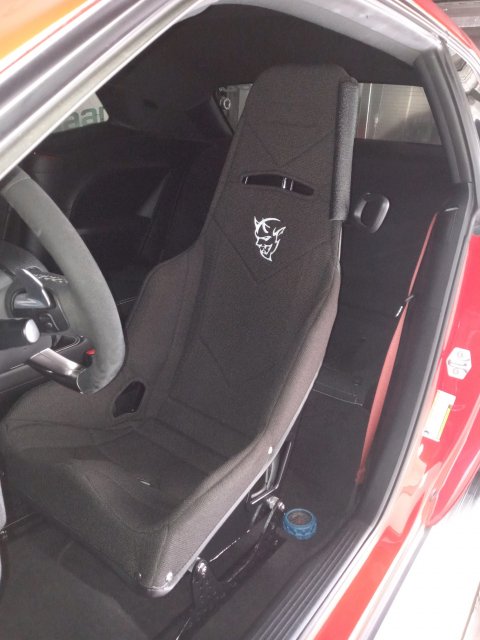
Hellcat Dan's setup, Ready to bolt in. TOTAL 18.8 pounds including Seat Belt Buckle, all bolts and floor spacers etc. Good luck.
I wanted my setup to be as light as possible and to be as versatile as possible. So I extended my steering column back/out all the way. I have to extend my foot to get WOT but can get hard on the brake pedal. Arm length is fine. With this setup I am thinking 6' drivers should fit ok. Much shorter than me and you will need 2" foam behind your back and we do have it handy.
I am going to ramble a lot and be sure and read all before each image.
Seat is a Kirkey 55170 Pro Street Drag. It has an 18 deg lay back and based on my Brackets the layback is even more. But I dislike the seat to be reclined a lot so I bet most will be OK with this setup.
I chose a Black Tweed KirKey seat cover. It has intergal foam that fits awesome. So,100% reccomended. 5517011.
Use a Mopar 1VL12DX9AE Seat Belt Buckle. Dremmel off the clocking pin or drive it out. Do NOT cut the wires off, since it makes it less useful.
Brackets are OMP HC925 36 hole, tall, aluminum. This is the ONLY Bracket that I found was tall enough and long enough to span the floor bolt pattern.
Floor mounting bolts are 10X1.5X30mm and I got TI here : https://www.ebay.com/itm/133507068513?var=432966129557
Seat mounting bolts are 5/16X1.25 UHL. I used TI fine thread.
Seat Belt Guide Mopar 1UV47DX9AA .
The first go round I used the Planted Steel Base for 2008+ Challenger Driver Side and their Aluminum Side Brackets. But that stuff is HEAVY. If you just want something to bolt in this would be the way to go. But you are still going to have to drill four 5/16" mounting holes in the side of the seat. I bet that setup unmodified would be 10-12 pounds heavier. It can use the same seat belt buckle. If you do not want to fabricate anything then most of the following will not be of much help, except the mounting bolt holes you could follow the same procedure, I think.
I also am going to talk about a wider seat. The next size up is an 18.5". One good thing about using the spacers with the 17" seat is it moves the bracket out from being flush with the side of the seat. If you did not use spacers it would be a good idea to dress down that weld bead some with a flat file because it sticks out a little. So this setup could easily be used with the 18.5" seat. You would use NO spacers between the brackets and the side of the seat, and the enlargments in the base slots where the floor mounting bolts go would move over .25". Then the bracket to seat mounting bolts would be 5/16X.75" UHL (under head length).
I made my Brackets and then ended up making 2 more sets. I layed out the cut lines a little different for the last 2 sets and I like they way they look way better.
This is the first set. If you pay attention you can see what holes are used and copy these. Except I would lay the cut lines out slightly different as you will see. This is MY SEAT SET for the 5'9" driver (give or take). I am 5'9" tall and 185 pounds. This bracket weighs 1.2 pounds, or less as pictured.
Here are the second sets. You can see I layed out the cut line more direct and it turned out much better. Also NOTE, one of these sets is for a taller Driver and is moved back ONE SLOT. This is as far as you can go back with these brackets since that was the last slot available. But be advised you COULD get the seat back about 3/4 to 1" farther by drilling the mounting holes farther forward on the seat.
OK, the floor mounting bolts fall right in line with the side of the seat. So in order to use these brackets you will need to use 1" of spacers total to move the brackets out. I used the remnants to make the spacers. So, two 1/4" spacers between the bracket and the seat on each mounting bolt. They must be large OD so you have lots of shear for strength. Here is a finished pic so you can see the result.
ALSO NOTE, the slots in the bracket do not line up exact with the floor bolt pattern and they are not wide enough, since they are for a 3/8" bolt VS the 10mm we are using. You have to enlarge the slot anyways, so kill 2 birds with one stone. I split the difference and file both end holes 1/8" twoards each other. This is clearly shown in this Pic, lower right.
The next thing is, I did not want the bracket sitting on the carpet and crushing the carpet and possibly the result is the bolts come loose. So, I used some of the other Remnants to make 1/4" thick Aluminum floor spacers. You could carefully cut the carpet and that way the bracket would sit metal on Metal and the bracket/seat would sit 1/4" lower.
Floor spacers seen in the pic on the right.
If you go the full route I will give you some tips. It is easier to lay out all your cut lines and cut the bracket down BEFORE trying to hole saw and drill any lightening holes. It's fits on the drill press table better. It is also WAY EASIER to lay out your cut lines for the FLOOR SPACERS and cut them first or at the same time as the basic shape of the bracket. I even drilled the holes to 10mm before cutting since that is easier too. I used a scribe and just scratched the black paint for my cut lines. I also buffed all the paint off with an silicon carbide deburring stringy disc in a hand drill. This de burrs all the holes. As seen in the one pic. Then I hit them on a belt sander etc to dial them in.
Now you need to drill the holes in the seat. 5/16" holes. Measure from the farthest back flat surface 3/4" and then measure up 3/4". It's important to do a nice job here, so take your time. I used a punch to locate the canter and drilled a 1/8" pilot hole, then 5/16. Now go to the correct location in the front and draw a line 3/4" up on the side. Next put a temporary short 5/16 Bolt and nut in the back hole you just drilled. Use the bracket as a template and center on the line you just drew. I also center punched and did a pilot hole first just to be sure. A transfer punch would be ideal here. I did this complete setup for a Friend and it turned out great. The seat with brackets installed does not rock on the bench. My personal one did. Not sure if my mounting holes were skewed or if my seat is slightly warped.
Also NOTE: if you want the seat back farther then you can drill these holes farther forward. Pay attention because there is not much practiacl useable room left to go forward.
You can see the seat belt buckle bolts directly to the side bracket with a 1/2" bolt. I used a 1/2" drill bit to do some of the lightening holes and so I had a couple different ones to use. The cover kind of straddles the aluminum so the buckle needs to be a little higher than you might think with the cover off.
I made a couple small brackets and bolted on a seat belt guide. It has to be shortened but this sould be a reasonable location for most drivers.
Hellcat Dan's setup, Ready to bolt in. TOTAL 18.8 pounds including Seat Belt Buckle, all bolts and floor spacers etc. Good luck.
Last edited:
-
 11
11
- Show All